
Importing contacts from a spreadsheet
The Contacts screen imports a spreadsheet in one go: you copy the columns in the spreadsheet, from Google Sheets or any other, paste them into the dialog and say which field each column goes to. A CSV file works too.
The phone number is required. It is how Vimel recognizes a contact that already exists, and it is that contact the conversation joins when the person sends a message.
The phone number needs an area code (DDD). A Brazilian number can come with or without the 55, and with or without brackets, spaces and dashes. A number from another country must start with + and the country code. Each cell takes a single phone number: a cell with two numbers or with an asterisk is rejected.
The product interface is in Portuguese, so the screenshots below are too. The labels are given here in both.
Where it is
Under CRM, in the Contatos (contacts) menu, the Importar (import) button opens the Importar contatos (import contacts) dialog. It has three steps, numbered on the screen itself.
The button only appears for people who see all contacts. Someone set to Apenas os contatos sob responsabilidade do usuário (only the contacts the user is responsible for) under Contatos e Conversas cannot import: the import writes outside that person's portfolio.
1. Paste the data or upload a file
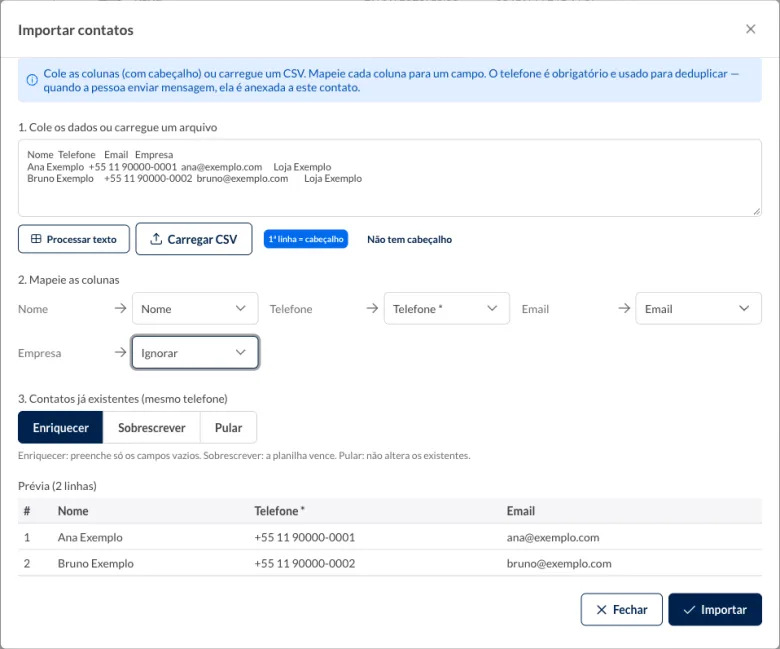
In the spreadsheet, select the columns together with the header row, copy them and paste them into the step 1 field. The field's own example shows the format: the first line with the column names, such as Nome, Telefone and Email, and one line per contact.
Then use Processar texto (process text). The 1ª linha = cabeçalho (first row is the header) tag shows that the first row is being read as the column names. If the spreadsheet has no header, click Não tem cabeçalho (no header), which only becomes available after processing. To use a file instead of pasting, the button is Carregar CSV (upload CSV).
2. Map the columns
Each spreadsheet column appears with a selector for the target field. The fields are Telefone (phone), the only required one, marked with an asterisk, Nome (name), Email, Instagram, Origem (source), CEP (postcode), Rua (street), Número (number), Complemento (address line 2), Bairro (neighborhood), Cidade (city), UF (state) and Tags. If the account has its own contact fields, created under Config. CRM on the Campos de contato (contact fields) tab, they appear after these, with the prefix Campo · before the name. Ignorar (ignore) leaves the column out.
In the screenshot's example, Nome, Telefone and Email came mapped to the fields of the same name, and Empresa (company), which has no matching field, came set to Ignorar.
3. Existing contacts
Step 3 decides what happens to a contact that already exists with the same phone number:
- Enriquecer (enrich): fills in only the empty fields, and adds the spreadsheet's tags to the ones the contact already has. This is the option that comes selected.
- Sobrescrever (overwrite): the spreadsheet wins.
- Pular (skip): leaves existing contacts unchanged.
Preview and import
Below the steps, the Prévia (preview) shows the first rows, with only the mapped columns and with each cell's text as it is in the spreadsheet; tags already appear split. Check it and use Importar.
At the end, the dialog lists the problems it found, row by row, with the phone number and the reason, such as "Telefone sem DDD; informe o DDD" (phone number without an area code; add the area code).
A Google spreadsheet linked to the funnel
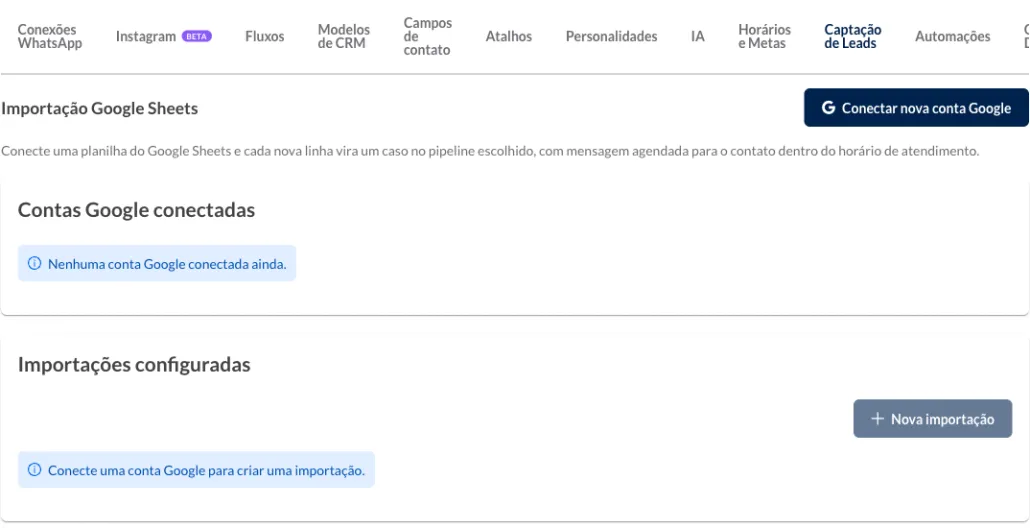
There is a second route, for a different use. Under Config. CRM, on the Captação de Leads (lead capture) tab, the Importação Google Sheets section links a spreadsheet to Vimel, and the screen describes it like this: "Conecte uma planilha do Google Sheets e cada nova linha vira um caso no pipeline escolhido, com mensagem agendada para o contato dentro do horário de atendimento" (connect a Google Sheets spreadsheet and every new row becomes a case in the chosen pipeline, with a message scheduled for the contact within business hours).
It starts with Conectar nova conta Google (connect a new Google account). While no account is connected, Nova importação (new import) is unavailable, with the notice "Conecte uma conta Google para criar uma importação" (connect a Google account to create an import). This article does not walk that route beyond its entry point.